Showing posts with label VLAN. Show all posts

Monday, July 25, 2011

How to confgure Inter VLAN in Layer 3 Switch

How to confgure Inter VLAN in Layer 3 Switch(Example):
 
Step 1:  Configure trunk & access port on Layer 3 SW and Layer 2 SW
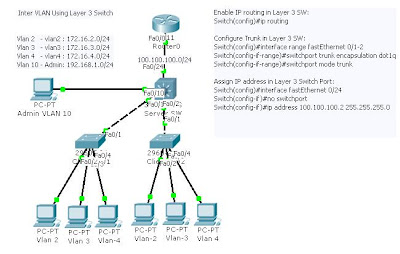
Layer 3 Switch (Syntax to configure trunk port in Layer 3 SW):
Switch#configure terminal
Switch(config)#interface range fastEthernet 0/1-2
Switch(config-if-range)#switchport trunk encapsulation dot1q
Switch(config-if-range)#switchport mode trunk

Layer 2 Switch (Trunk Port):
Switch#configure terminal
Switch(config)#interface fastEthernet 0/1
Switch(config-if)#switchport mode trunk

Configure Access port (Layer 3 or Layer 2 Switch):
Switch(config)#interface fastEthernet 0/2
Switch(config-if)#switchport mode access
Switch(config-if)#switchport access vlan 2

Note: Same configure to other switch port.

Step 2: Configure Switch as Server, Client & Transparent  and create VLAN as your requirement
 
Old syntax of Configure VTP and VLAN:
Switch#vlan database
Switch(vlan)#vtp server/client/transparent
Switch(vlan)#vtp domain cisco
Switch(vlan)#vtp password cisco

Create Vlan:
Switch(vlan)#VLan 2 name vlan2
Switch(vlan)# exit   >> exit from vlan database config mode
 
New syntax of Configure VTP and VLAN::
Switch#enable
Switch#configure terminal
Switch(config)#vtp mode server/client/transparent >> as your requirement
Switch(config)#vtp domain cisco
Switch(config)#vtp password cisco

Note: Configure other switch by using same syntax

Switch#configure terminal
Switch(config)#vlan 2
Switch(config-vlan)#name vlan2

Note: Create VLAN as your requirement

Step 3: Configure Virtual interface in Layer 3 Switch as your requirement. Layer 3 Switch route network using virtual interface.
Switch#configure terminal
Switch(config)#interface vlan 2
Switch(config-if)#ip address 172.16.2.1 255.255.255.0
Switch(config-if)#no shutdown

Note: same configuration for your required VLAN

Step 4:  How to Assign IP address in Layer 3 Switch port
Switch#configure terminal  
Switch(config)#interface fastEthernet 0/24
Switch(config-if)#no switchport
Switch(config-if)#ip address 100.100.100.2 255.255.255.0

 Step 5: How to configure Layer 3 Switch as a router
Switch#configure terminal  
Switch(config)#ip routing     >> Enable IP routing

Switch#configure terminal  
Switch(config)#ip route 0.0.0.0 0.0.0.0 100.100.100.1  >> Configure default route

Note: you can also use any routing protocol in Layer 3 switch (RIP, EIGRP, OSPF etc).
 
Optional Step: Assign IP address in Switch (Layer 3 or Layer 2)
Switch#configure terminal  
Switch(config)#interface vlan 10
Switch(config-if)# ip address 192.168.1.2 255.255.255.0
Switch(config-if)#no shutdown
Switch(config-if)#exit
Switch(config)#ip default-gateway 192.168.1.1
Note: use for management purpose (Telnet, SSH etc….)
Configure all your PC as assigned network policy. Here I provide, just example. You configure your network as your requirement by flowing above step.


Example of Inter VLAN Configuration:


Deleting VLAN Database: By Default VLAN Database save in Flash memory as (vlan.dat). Is not store in running config...


Switch#show flash:  >> To show vlan Database
Switch(config)#no vlan 20  >> to Delete single VLAN from VLAN DB
Switch(config)#no vtp mode  >>  delete vtp mode  (If have)


Switch#write erase  OR Switch#erase startup-config  >> To erase Start-up Config then
Switch#delete flash:vlan.dat OR Switch#delete vlan.dat  >> to delete vlan.dat file
Switch#reload   >> reload or Power OFF then ON.

Thursday, June 9, 2011

How to configure VLAN

VLAN Configuration short note (example for cisco):

Step 1: Router Configuration:

Router>enable
Router#configure terminal

Router(config)#interface fastEthernet 0/0
Router(config-if)#no shutdown
Router(config-if)#exit        >> just enable this interface

Router(config)#interface fastEthernet 0/0.10  >> create virtual interface associate with vlan number or as requirement
Router(config-subif)#encapsulation dot1Q 10 >> encapsulate interface associate with vlan number
Router(config-subif)#ip address 172.168.110.1 255.255.255.0  >> configure IP address

Note : Create virtual interface for each vlan as your requirement as above.

Step 2: Configure VTP Server, Transparent, and Client mode:
Three type of VTP mode, Server, Client, Transparent.
Switch>enable
Switch#configure terminal

Switch(config)#vtp mode server/client/transparent  >> Depend on your requirement 
Switch(config)#vtp domain aiub                               >> Use your own domain
Switch(config)#vtp password cisco                           >> Use your own password

If you need to configure VTP Transparent mode, so you have to define vlan name or number in transparent switch, which VLAN are directly connected with transparent switch. Example:  Switch(config)#vlan 10 or Switch(config-vlan)#name admin. If you configure switch as vtp client, you not need to configure anything.

Step 3: Create VLAN:
Switch>enable
Switch#configure terminal

Switch(config)#vlan 10
Switch(config-vlan)#name admin
Switch(config-vlan)#exit

Switch(config)#vlan 20
Switch(config-vlan)#name account
Switch(config-vlan)#exit

Switch(config)#vlan 30
Switch(config-vlan)#name wireless
Switch(config-vlan)#exit

Create vlan as your requirement from 2 to 1001. Another important thing is 5 fixed vlan already configured in any cisco switch. Example: 1 default, 1002 fddi-default, 1003 token-ring-default, 1004 fddinet-default and 1005 trnet-default.

Step 4: Configure Switch Port:
Two type of switch port in vlan, trunk (carry multiple vlan trafic ) and access ( end user ) port.

Trunk Port:
Switch#configure terminal
Switch(config)#interface fastEthernet 0/1   >> single interface
Switch(config)#interface range fastEthernet 0/1, fastEthernet 0/10, fastEthernet 0/20 >> range of interface you can configure at a time
Switch(config-if)#switchport mode trunk 

Switch(config-if)#switchport trunk native vlan 10  >> If vlan 10 or admin is native vlan or as your requirement. Native vlan use for administrator season

Access port:
Switch#configure terminal  (same to another port as your requirement)
Switch(config)#interface fastEthernet 0/3                  >> direct connected to end user
Switch(config-if)#switchport mode access                 >> Configure port as access port
Switch(config-if)#switchport access vlan 20              >> Assign port to specific VLAN

Access Port with Voice VLAN (IP Phone):  (If you need to configure Voice VLAN in your network)
Switch#configure terminal
Switch(config)#interface fastEthernet 0/4
Switch(config-if)#switchport mode access
Switch(config-if)#switchport voice vlan 1

Note: By default Voice configured as default VLAN. But you can change VLAN as your requirement. Another thing you need to configure DHCP pool for your Voice VLAN. Example bellow:

Switch#configure terminal
Router(config)#ip dhcp pool voice      >> Create a dhcp pool, name voice or as your need
Router(dhcp-config)#network 172.16.20.0 255.255.255.0 >> mention which network participate
Router(dhcp-config)#default-router 172.16.20.1 >> Getway of this network


Step 5. DHCP Configuration in Router:

If you want to configure DHCP in your VLAN network, so flow those steps as your requirement.

Router>enable
Router#configure terminal

Router(config)#ip dhcp pool wireless   >> Create a dhcp pool, name wireless
Router(dhcp-config)#network 192.168.130.0 255.255.255.0 >> mention which network participate
Router(dhcp-config)#default-router 192.168.130.1 >> Getway of this network
Router(dhcp-config)#dns-server 200.200.200.2       >> if you have DNS address

Router(config)#ip dhcp excluded-address 192.168.130.2  >> single IP address fix, like printer, server or any purpose
Router(config)#ip dhcp excluded-address 192.168.130.3 192.168.130.10 >> Range of IP address (low IP to high IP),  as your requirement. 


Important VLAN Command:

Switch#show vtp status                 >> VTP domain status
Switch#show vlan brief                >> VTP all VLAN status in brief
Router#show vlan-switch brief     >>(Router command) VTP all VLAN status in brief
Switch#show vlan id                     >> VTP VLAN status by VLAN id
Router#show vlan-switch id         >> (Router command) VTP VLAN status by VLAN id
Switch#show vlan name account  >> VTP VLAN status by VLAN name

Switch#show interfaces trunk       >> Show interface trunk information
Switch#show interfaces vlan 30    >> show access interface
Switch#show spanning-tree vlan 10 
Switch#show mac-address-table
Switch#show cdp neighbors    >> Only for Cisco device
Switch#show cdp neighbors detail   >> Only for Cisco device


Deleting VLAN Database: By Default VLAN Database save in Flash memory as (vlan.dat). Is not store in running config...


Switch#show flash:  >> To show vlan Database
Switch(config)#no vlan 20  >> to Delete single VLAN from VLAN DB
Switch(config)#no vtp mode  >>  delete vtp mode  (If have)

Switch#write erase  OR Switch#erase startup-config  >> To erase Start-up Config then
Switch#delete flash:vlan.dat OR Switch#delete vlan.dat  >> to delete vlan.dat file
Switch#reload   >> reload or Power OFF then ON.